Sunday, October 20, 2013

Installing WordPress (Software) Manually

The manual installation of WordPress (Software) that's instructed in this documentation is divided into five parts. But of course, you need to get a domain name and find a suitable web host that meets the system requirements first before proceeding to the installation. You can follow these guidelines to install WordPress to your website.

Download and Extract the Software Package

  1. Go to WordPress › Download WordPress.
  2. And click on such as the “Download WordPress 3.6.1” button for version 3.6.1, to download the software package.
  3. Wait a minute while your computer is downloading such as the "wordpress-3.6.1.zip" file for the version 3.6.1. It may take 1 to 2 minutes, depends on the speed of your connection and if the server isn't busy.
  4. Now “Show in folder” the newly downloaded ZIP file.
  5. And ‘Extract to "wordpress-3.6.1\"’ (or to what version your WordPress is,) that ZIP archive.

Now you have the real contents of WordPress software if you've followed the instructions above.

Create a Database and Its User

  1. Log in to your control panel.
  2. Note that you need to remember the values of the database name, username and the password you chose and the value of your database hostname if any which is usually be "localhost" in default.
  3. And create a MySQL database and its user, and select all the privillages for this user to complete the task.

Set Up "wp-config.php" File

You can either rename and edit the "wp-config-sample.php" file yourself, or you can skip this section and let WordPress try to do this itself when you run the installation script. You just need to tell WordPress your database details later while Running the Script if you've skipped.

  1. On your computer, find the extracted file folder such as "wordpress-3.6.1" in my case, which is often in the Downloads folder of the user's home directory.
  2. Open that folder, and under it, there you will see another folder named "wordpress".
  3. And open that folder named "wordpress".
  4. Now, you will see the "wp-config-sample.php" file.
    1. Right click on this PHP file to "Rename" it.
    2. And change the name of the "wp-config-sample.php" file to "wp-config.php".
  5. Now, edit the renamed file "wp-config.php" with a text editor. And enter your database details under the section labeled:
    // ** MySQL settings - You can get this info from your web host ** //
    1. Change the value "database_name_here" to the database name you created for WordPress.
    2. Change the value "username_here" to the username of your database user you created.
    3. Change the "password_here" to the password of your DB user that you chose.
    4. Change the value "localhost" if only your MySQL hostname is different from that value.
    5. The database character set therein the file is "utf8" and normally should not be changed!
    6. The database collation with the attribute of DB_COLLATE should normally be left blank!
    And now focus under the section labeled:
    * Authentication Unique Keys and Salts.
    1. And run a web browser (but don't close the text editor) and go to: https://api.wordpress.org/secret-key/1.1/salt/
    2. And copy all the code text therein the web page. It contains automated random secret key values.
    3. And go back to your "wp-config.php" file-editing text editor.
    4. And select from the beginning of the line with the code define('AUTH_KEY', to the end of the line started with the code define('NONCE_SALT',

Monday, October 14, 2013

How to Find the Root Web Directory's Location?

In this blog, you'll see how to find the location of the root directory for your specific domain that's hosted by your web hosting provider.

On cPanel

If you're using cPanel, you may see your Home Directory under the content Stats on the sidebar, but it may not the root directory of any of your hosted domains. But it could be the containing folder of the root directory for your domain.

  • To find the root directory for your addon domain or even for your main domain that's listed at the row Main Domain of the content Stats.
    1. When you click the “File Manager” on the cellbox Files and if you didn't mark to skip the follow up question yet.
    2. There you will see the popup File Manager Directory Selection.
      Customized File Manager Directory Selection of cPanel
    3. Select the option with the words “Document Root for:”.
    4. And choose the hosted domain you want to see the location of its root directory.
    5. And lastly, click the "Go" button below the popup area.
    6. In File Manager, focus on the top left area of the application interface.
      The Location of Root Web Directory on the File Manager of cPanel

How to Find the Hostname of a Database Server?

Some web software for a website needs the value of the hostname of a database server for it to be installed to a web server, such as WordPress (software) which needs MySQL database connection details. The MySQL database hostname will usually be "localhost" on most web hosting companies, but not always!

The name could be simply "localhost" if your database is local to your web server or to the server on your hosting provider. But if your database is external to your web server or to your hosting server, then you or your hosting provider would need to put the name of that database.

Most Hosting Providers

To be sure about your database hostname, here we will going to find the exact hostname of MySQL server through the application called phpMyAdmin, version 4.0.5:

  1. First, log in to your control panel.
  2. Find the PHP application "phpMyAdmin":
    The Application 'phpMyAdmin' on the Home of cPanel
    • On the Databases heading section if you're using cPanel.
    • Or on the Advanced Features heading section if you're using DirectAdmin Web Control Panel.
    And then click it to run that application.
  3. And in phpMyAdmin, the value of the item "Server" on the top of the user interface, is your database hostname.
    The Database Hostname on the Application Interface of phpMyAdmin Version 4.0.5

Wednesday, October 9, 2013

Automated Installation Using an Installer

An auto installer also known as scripts installer, is used to automate the installation of the software. For you to know more about it, visit What is a Web Application Auto-Installer?

Requirement: Your server hosting account must have the specific auto installer that you will going to use!

Note that we already have blogs how to automate the installation of the software that you want to install to your website by using:

Softaculous Auto Installer Fantastico De Luxe

If the web application installer on your control panel is different from the scripts installers that are linked above, then you can still view them to see how it works. Actually it's really easy to use an auto installer, you can even use it without any instructions but if you still need it, as I said you can view the links above and you can also check the following simple guidelines below for using a simple auto installer:

  1. Log in to your control panel that have the specific scripts installer that you'll going to use.
  2. Find the “Auto Installer” application on your logged control panel. It may be found on the Website section of the applications and may have a name such as “Auto Installer” or any.
  3. Inside the web application installer, find the exact name of the software you may wish to install to your website, and click it.
  4. Now you may see some information about the software that you've chosen. You will going to install it and when you're now on the installation form, fill out that form such as these:
    1. Choose what folder do you want to “Install To”. For example if you want to install in only "example.com" then leave it empty, and if you want to install to "example.com/wordpress" then fill the word "wordpress" therein the field.
    2. Fill your personal username in the “Administrator username” field.
    3. Fill a strong password in the “Administrator password” field.
    4. There may be another fields which was not listed here. And if there are another fields, you need to fill out all the required fields therein the form!
    And last, click on such as “Install {Software Name} to continue. (Note that the {Software Name} is our term on the name of the software you chose.)

Tuesday, October 8, 2013

Automated Installation Using Fantastico

Fantastico De Luxe is an auto installer for cPanel servers. For more information about Fantastico De Luxe, please visit What is a Web Application Auto-Installer? To be able to use this autoinstaller, your web server hosting must have it! Asking how to use Fantastico De Luxe? Here we will going to automate the installation of the software that you want, by using Fantastico De Luxe:

  1. Log in to your cPanel server hosting account.
  2. Run the application named “Fantastico De Luxe” under the Software/Services (heading) section.
    Fantastico De Luxe on Host-ed.net cPanel
  3. Make sure that you haven't reached your database limit for a new database.
  4. Choose and click the software that you want to install (which in my case is WordPress), on any of the items (scripts) that are listed on the left.
  5. Now you will see the disk space required and the disk space available on your server. Make sure you meet the required space.
  6. Click the link New Installation.
  7. In the part Install {SOFTWARE} (1/3):
    (Remember that in this blog, the {SOFTWARE} means the name of the software that you've chosen.)
    1. Installation location
      1. Choose in the “Install on domain” selection what domain name do you want to install the software.
      2. Fill up the “Install in directory” if you're going to install the software on a directory of your domain (e.g. "example.com/UNEXIST/"). The directory should not exist, it will be automatically created. Just leave it empty to install in the root directory (e.g. "example.com").

Automated Installation Using Softaculous

Most leading Control Panels like cPanel, Plesk, DirectAdmin, InterWorx and H-Sphere have Softaculous Auto Installer. For more information about Softaculous, please visit What is a Web Application Auto-Installer? To use Softaculous Auto Installer, your web server hosting must have it! Here are the instructions how to automatically install the software that you want, to your website by using Softaculous:

  1. Log in to the control panel of your hosting account.
  2. Click the application named "Softaculous" on the section such as Software/Services heading for cPanel user.
    Softaculous on HelioHost cPanel
  3. Find the exact name of the software you may wish to install. (For this time we choose WordPress.)
  4. Check the Space Required and make sure you have enough space and can able to add another database.
  5. And click Install for automated installation of the software that you've chosen.
  6. And fill out the following form:
    1. Software Setup
      1. “Choose Protocol” that you have wanted. If your site has SSL, I suggest to choose the HTTPS protocol.
      2. “Choose Domain” where you want to install the software.
      3. The directory is relative to your domain and should not exist! For exmple, to install “In Directory” at "example.com/unexist/", just type "unexist". Leave it empty to install only in "example.com".
      4. Type the “Database Name” that you want to be created for the automated installation.
    2. Database Settings
      1. I suggest to leave the “Table Prefix” in its default. It will be the prefix of every table name on the database that will be created, such as "wp_users", "wp_posts" and "wp_comments" if you have "wp_" as your table prefix.
    3. Site Settings
      1. Fill the title of your website in “Site Name”.
      2. Fill the description of your website in “Site Description”.
      3. “Enable Multisite (WPMU) option for your WordPress blog if you want but your server must support Apache mod_rewrite to use this feature.
    4. Admin Account
      1. Fill your personal username in “Admin Username”.
      2. Fill a strong password in “Admin Password”.
      3. Fill the email of the original administrator, in “Admin Email”.
    5. Choose Language
      1. “Select Language” depends on your dialect and on the language of your site.
    6. Select Plugins
      1. Checking “Limit Login Attempts” will installed and activated the specific plugin that will limit the login attempts, with your installation.
    • If you want more advanced then you would surely fill out Advanced Options also.
      1. If you don't want to receive an email notification for updates available for the installation, then “Disable Update Notifications”.
      2. Check “Auto Upgrade” if you want the installation to be automatically upgraded to the latest version when a new version is available.
      3. Choose the frequency for “Automated backups” to perform, if you want Softaculous to automates the backups via CRON as per the frequency you select.

Monday, October 7, 2013

What is a Web Application Auto-Installer?

An auto installer (also known as web application installer or scripts installer,) automates the installation of web applications such as WordPress, Joomla! and Drupal, to a website or on a server hosting account. Of course there are many auto-installers around the Web and the well-known among those are listed below:

  • Softaculous is having 312 great scripts, 1115 PHP Classes and still adding more. It is widely used in the Web Hosting industry and it has helped millions of users to install applications by the click of a button in just ONE STEP. Their Auto Installer easily integrates into leading Control Panels like cPanel, Plesk, DirectAdmin, InterWorx and H-Sphere.
  • Fantastico De Luxe is an autoinstaller for cPanel servers with more than 10.000 installations. It provides more than one million end users the ability to quickly install dozens of the leading open source content management systems into their web space.

Sunday, October 6, 2013

Get a Domain and Meet the System Requirements

Here are the complete instructions how to ready the things such as domain name and web host or server, that are needed before installing web software such as WordPress, on a website or on a hosting account or before developing an advanced website:

Get a Domain Name

  1. Create an account on a domain name registrar or on a web hosting provider that have domain name registration service.
  2. Choosing the right domain name for your website isn't that easy. I require you to spend time or even days for just searching an available domain name that matches your business name. Because when it's purchased, there is no way to rename it. But you can still get another domain name if you want!
  3. Register your chosen domain name through your domain provider. It's also possible for an unavailable domain name to buy it somewhere, such as by contacting the domain owner or through the link to buy that domain on the page with the URL of the domain if it's for sale.

Check the System Requirements

Your web (hosting) server must meets the system requirements of the software that you're planning to install or to develop. If you're going to develop a web application, your server need to support a database management system (DBMS).

  • You can check the WordPress requirements at WordPress › About » Requirements. Your web server must supports the minimum requirements for this software, PHP version 5.2.4 or greater and MySQL version 5.0 or greater.
  • The hosting requirements of Joomla! for JVersion 3.1 can be seen at J3.1 Installing Joomla - Joomla! Documentation, its language is PHP 5.3.1+ and it supports databases MySQL 5.1+, MSSQL 10.50.1600.1+ and PostgreSQL 8.3.18+ and web servers Apache 2.x+, Nginx 1.0 and Microsoft IIS 7. And at J2.5 Installing Joomla - Joomla! Documentation for JVersion 2.5, it required PHP v. 5.2+, MySQL 5.04+ and Apache 1.3.
  • The system requirements of Drupal can be seen at System requirements | drupal.org. Drupal 6 required PHP 4.4.0+ and MySQL 4.1+ or PostgreSQL 7.1. Drupal 7 required PHP 5.2.5+ and MySQL 5.0.15 or higher with PDO, or PostgreSQL 8.3 or higher with PDO, or SQLite 3.3.7+. Drupal 8 required PHP 5.3.10+.
  • The system requirements for other web software can be seen on the requirements of their online documentation or on the requirements' section of their readme.html documentation inside the extracted software package.

A proper web server must supports a relational database management system (RDBMS) such as MySQL and a server-side scripting language such as PHP: Hypertext Preprocessor.

Find a Suitable Web Host

  1. Now find a web host that allow you to create a hosting account that meets the system requirements. The standard Internet hosting provider is host.duoservers.com.

Sunday, July 21, 2013

How to Install and to Update an IDE for Web?

Why should a web developer write code using an integrated development environment (IDE) for web development? Simply because of its tools and features such as intelli-sense, short for “intelligent sense”, which attempts to speed up the process of coding web applications by reduction in misunderstandings, typos and other mistakes that programmers commonly make.

Installing an IDE

Here, you will see the instructions for installing an integrated development environment, and the specific IDE that we'll going to install as our example is a freeware, Microsoft Visual Studio Express 2012 for Web. You can install “Visual Studio Express 2012 for Web - English” at Windows Web App Gallery - Install an App.

Web Platform Installer 4.5 Fail to Install Visual Studio Express 2012 for Web - English

Keep note, some people are reporting that the Microsoft Web Platform Installer (WPI) is broken. Mostly if you'll going to install Visual Studio Express 2012 for Web on the computer which was allowed its other user to log in automatically after starting it without entering user name and password, because installing this VS Express will require to reboot your computer, therefore, after restarting, you'll be logged with a different user. Or if you didn't leave the “Windows Web App Gallery - Install an App” page open until the WPI starts. Now, if it fail with such details that's shown on the image above, please follow these steps:

  1. Internet connection required! Download “Microsoft Visual Studio Express 2012 for Web” from Download Microsoft Visual Studio Express 2012 for Web from Official Microsoft Download Center.

Friday, July 19, 2013

Types of Web Development Applications

There are types of software applications for web development that's used by web developers or even web designers for developing or designing websites. Many of those types with their so-called classes, are listed below.

Text Editors:

Some text editors are simple, while others offer broad and complex functions that's used for writing source code and programming.

  • A text editor is a type of program used for editing text files. Some regular text editors such as Windows Notepad (software) can save as HTML and Cascading Style Sheet (CSS) documents simply by using file extensions such as ".html", ".htm" and ".css". There are also text editors designed for use from a command line interface (CLI) and in a graphical user interface (GUI) such as Vim.
  • A source code editor such as Sublime Text, is a text editor program designed specifically for editing source code of computer programs by programmers, and can able to edit any code, whether it's CSS document or PHP file unlike some HTML editors. There are programmers that likes to use this kind of text editor and not to use an integrated development environment for a reason.

HTML Editors:

There are various forms of HTML editors such as text, object and WYSIWYG editors. For more information about HTML editors, please visit The “Text, Object and WYSIWYG” HTML Editors.

  • Text editor is one of the types of HTML editors as it can act like a basic HTML editor that can able to edit HTML documents, mostly if it can save files with file extensions such as ".html" and ".htm".
  • An HTML (hyper-text markup language) editor is a web design program for creating web pages. Some HTML editors couldn't edit the file other than HTML document that end in ".htm" or ".html" and designed not for program's source code but for writing HTML code.
  • Object editors are web page-creation tools that functions like Blogger Layout object editor. You couldn't see on the interface what you get but you'll see the objects of your website, that can be drag and drop in order to rearrange their positions or orders.
  • WYSIWYG (what you see is what you get) HTML editors provides an editing interface which resembles how the web page will be displayed in a web browser. Despite of their nice interface, they could only build static websites, in contrast to dynamic sites.

Tuesday, July 16, 2013

How to Install a Software on Your Website?

There are ways for installing a software such Content Management System (CMS), on the server of your web hosting account. If you have no idea what a software is, please take a look at the Types of Web Hosts and Website Software.

Manual Installation:

The list below will give you an understanding how to manually install a software, considering that the software that we'll trying to install is an open source CMS called Pligg (specifically Version 1.2.2), which replicates some of Digg's features and back-end:
  • Your domain name on a Domain Name Registrar or Registration Service must be prepared.
  • Check the required web hosting features of the software that you'll going to use. Most requirements are written on the software's official site. In fact, the Requirements to Run Pligg are written at Download Pligg Content Management System _ Pligg CMS. And follow the right one among these following actions depend on your situation what you have done first:
    Find a web hosting service that's fully supports the requirements, and point your domain name to the DNS your of web host. If you already have a web host, your account must supports the requirements. Or upgrade your plan or find another web host if it's not supported.
  • Download the latest version of the software that you've wanted. For example, the latest Pligg from Download Pligg Content Management System _ Pligg CMS. The estimated time of downloading it is just 1 minute. Some site required you to register an account first before they allow you to download their product.
  • Unzip the downloaded package if it's zipped by following the guide How to Extract a .ZIP file. Some online installing instructions have a step to unzip their package.
  • And read the ReadMe document which is often named as readme.html on the down one folder of the extracted folder, where the software components such index.php is located. Other software package have a top text document such “Pligg README.txt” for Pligg, on the folder of the extracted package, that will tell you where to find the ReadMe document.
  • In the Installation section of “Pligg CMS 1.2.2/pligg/readme.html”, you will be instructed to do such kind of things:
    1. Create a MySQL database. If you are unfamiliar with how to create a MySQL database, please... (visit Creating and Managing a Relational Database on Web Hosting Control Panel.)
    2. Rename the /languages/lang_english.conf.default file to "lang_english.conf". Same instructions apply to any other lang_LANGUAGE.conf.default file that you might use that are located in the /languages directory. (The software components in “\Pligg CMS 1.2.2” are located at \pligg directory. If renaming an extension warns you by your system with a new window Rename, If you change a file name extension, the file might become unusable. Are you sure you want to change it? Just allow it every time it appear by pressing "Yes".)
    3. Rename the file approvedips.txt.default to "approvedips.txt".
    4. Rename the file bannedips.txt.default to "bannedips.txt".
    5. Rename the file settings.php.default to "settings.php".
    6. Rename the file local-antispam.txt.default to "local-antispam.txt".
    7. Rename the /libs/dbconnect.php.default file to "dbconnect.php".
    8. Now upload the component files of the software to your web hosting server. (The best way to upload a huge amount of files is through an FTP client. Please visit Uploading Files with an FTP Client.)

Sunday, July 14, 2013

How to Change File Permissions or CHMOD?

CHMOD and Change File Permissions are used to change the access of a file to file system objects including files and directories. The name CHMOD stands for or is an abbreviation of change mode. Here is a great video for learning how to change file permissions or to CHMOD a file:

Uploading Files to a Server via an FTP Client

This is the guideline to upload contents from your computer to the server of your web hosting account with an FTP client. The specific FTP client that I'll going to use is FileZilla Client (3.7.1), and the specific files that I'm going to transfer are all the files in the "pligg" folder of the unzipped package of Pligg CMS 1.2.2 as our example:
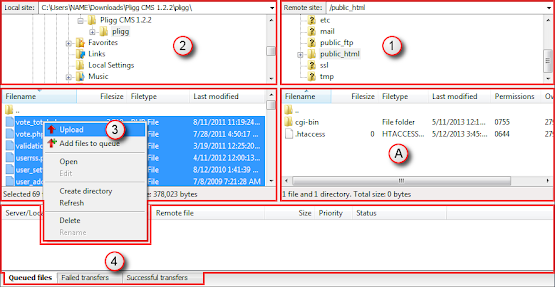
Step and option elements of FileZilla's window layout for uploading
  • First, you need to connect your FTP client to the FTP server of your web hosting account by these instructions.
  • And do the specific action below depend on the connection option that you've been chosen, when Status: Directory listing successful be shown on the message log, mostly in FileZilla Client:
    When the Manual Settings or the details of your FTP user that you've been chosen have the exact path of the Document Root of your domain, just make sure the “Remote site:” (1) of the remote pane (1 & A) is just as single "/" slash. But when the Manual Settings or the FTP details have the Path of the parent folder of your domain's document root, you need to browse and set the current address of the “Remote site:” (1) which is "/" in default, to the folder of your domain, for example as "/example.com".
    Just be patient and wait the FTP client (software) while it's directory listing every time you select a new different “Remote site:” (1).
  • And browse the Local site: (2) of the local pane (2 to 3) and set it to the address of the folder containing all the files that you're going to upload, which in this case on my computer is: C:\Users\NAME\Downloads\Pligg CMS 1.2.2\pligg
    (Note: You can do this step first before connecting to a server for avoiding Error: Connection closed by server.)

Connecting to an FTP Server with an FTP Client

The first thing to do if you want to use an FTP client (software) is to connect it to the FTP server of your web hosting account. If you don't know what an FTP client is, please visit What's the Best Way to Upload Files to a Server. Here are the instructions how to connect to an FTP server and the FTP client that I'm using is FileZilla Client:
  • Make sure you have an Internet and run a web browser to check the Manual Settings or the details of your FTP account. For cPanel user, follow these instructions to find the Manual Settings. But even a different web hosting control panel that's quite similar to cPanel can follow this but maybe with a different action as just example:
    1. Go to and login to your cPanel.
    2. Click on “FTP Accounts” which is located in the Files (heading) section.
    3. There may configurations that you can use for your FTP client and these are the better two:
      In the FTP Accounts section, look for the row with the exact PATH of the Document Root of your Addon Domain or Subdomain and click the “Configure FTP Client” action on that row. And if there's no exact FTP Path, you can just Add FTP Account with the Directory of your domain's root and “Configure...” that new FTP account. Or in the Special FTP Accounts section, you can seek the row with the PATH of the parent directory of the Document Root of your domain. For example if your domain's root is "/home/USER/public_html", the parent of that root is "/home/USER". And after that, click the “Configure FTP Client” action on that row.
    4. These are the two specific results for those 2 specific actions on the previous step:
      And now, you will see the Manual Settings with the path of your domain or subdomain name for your FTP client. The Manual Settings that you'll see in the second configuration have a PATH of the parent folder of your domain's document root.
    Here is another way to find the details of your FTP user for other kind of control panel, or if this isn't the exact way to find those details in your c-panel, just use a logic, at least to get some tips:
    1. Go to and login to your web hosting control panel.
    2. If you didn't redirect to the Home of your control panel but to the other page such Special Offers after logging in your web hosting account, just find a way to the control panel's home, you can try to click on "Home".
    3. In the Website Manager (heading) section of the Home of your c-panel, click on “FTP Manager”.
    4. Then find a compatible user on the FTP users in your account for your domain or subdomain:

Tuesday, July 9, 2013

Creating a Relational Database on C-Panel

There are many kinds of relational databases, such a MySQL database of MySQL a relational database management system (RDBMS) and a PostgreSQL database of PostgreSQL an object-relational database (ORD).

Creating a MySQL Database

Some web hosting control panels have a MySQL Database Wizard application that will guide you step by step on the creation of a MySQL database. Here are the steps to create and manage a MySQL database through this wizard app. for cPanel user. In the Home of your control panel:

This is a guide to creating and modifying MySQL database(s) in cPanel, through the “MySQL® Databases” application:

Monday, July 1, 2013

What is a .ZIP file and How to Extract It?

A .ZIP file is an archive file containing one or more files or folders that have been compressed. The file size of compressed file is much lower than the size when it's not yet compress. .ZIP files generally use the file extensions ".zip" or ".ZIP" and can be decompress or unzip by a specific file archiver. Almost all software packages that can be download on the Internet are compressed, mostly in zip (file format). There are ways to compress zip file, and the standard way to do it is by using a file archiver.

Now we will use a file archiver to unzip a zip file. My recommended file archiver to extract a zip file is no other than an open source, 7-Zip. And here is the 7 steps to do it using 7-Zip:
  1. The first thing you need to know is your computer must have file archiver program installed on it. For example a file archiver at this time is 7-Zip, and the guidelines of this program's installation is written in What is and How to Install a File Archiver?
  2. When the file archiver installed on your computer, just right click on the zip file that you wish to be extracted or in other term, to unzip.
  3. Click or just point your mouse cursor to the "7-Zip" option on the options that would appeared after doing the previous step.
  4. Then now click "Extract file..." on the bar at the side of the "7-Zip" option that will appear after the previous step.
  5. Now you will see a new window titled Extract. There you will see the “Extract to:” text field filled with the path name of a folder where the extracted files of the zip file will be placed later. You can even browse that field and change the pathname to a different folder if you want. Yet, you can also configure the “Path mode”, “Overwrite mode” and fill the “Password” field if you wish. There is a "Help" button if you didn't knew those options. And click "OK".
  6. In this time the zip file is now Extracting... or unzipping, in just a second!

Sunday, June 30, 2013

What is and How to Install a File Archiver?

A file archiver is a computer program that can compress a number of files or folders together into one archive file with a file extension such .zip, etc... And can then extract this archive file into one folder. Most software packages in big sizes are compressed to make the downloading of those packages quick. Archive files are basically needed to decompress before you can fully use the files therein, because they're compressed and not in their physical sizes.

These are the straight steps to install a file archiver on your computer. The specific operating system of my computer that I'm using where I will install a file archiver is Microsoft Windows. But even your computer has a different operating system, these steps can still give you some guides to install a file archiver. My recommended file archiver is no other than an open source, 7-Zip and that is the program that I will document how to install:
  1. Go to the Download page of 7-Zip. And make sure you have an Internet connection.
  2. In that page, download the file appropriate for your platform. And after this, Your download will start shortly...

Wednesday, June 26, 2013

Learn How to Update FileZilla (FTP) Client

Here we will going to update FileZilla Client an FTP client. For more information about FTP client, please read The Best Way to Upload Files from Your Computer to a Web Server. The specific version of FileZilla client that we'll going to update as the example of the set of steps below is version "3.6.0.2":
  1. First, open your FileZilla client to run it.
  2. The guides where to find the nested “Check for updates...” button are listed bellow:
    • Click "Help" on the top of the FileZilla interface layout.
    • Then click the nested “Check for updates...” button.
    Check for updates on the Help menu of FileZilla client
  3. After that, you can choose an advanced option if you wish:
    • When you check the “Check for beta versions of FileZilla” box, you will get notified if Do you really want to check for beta versions? Unless you want to test new features, keep using stable versions. If you want to accept it, then just press the "Yes" button.
    • And I didn't recommend to “Check for nightly builds of FileZilla”. Actually, after checking that box, you'll get alerted with this quote: Warning, use nightly builds at your own risk. No support is given for nightly builds. Nightly builds may not work as expected and might even damage your system. Do you really want to check for nightly builds?
    Therefore, do not check for nightly builds! And then, click “Next >” to continue.
  4. And wait a few seconds while the system is checking for available updates... (Note: This action requires Internet connection.)
  5. After that, the newer version with a text-box noted of new features, will then appear if there's new available version! Just click the “Next >” button to download the new version.
  6. Now, you will be asked to “Select download location for package” with an editable filename of a setup in .exe file extension. You can just and it's better to make the “File name:” default which is looks like "FileZilla_3.7.0.1_win32-setup" or "FileZilla_3.7.1_win32-setup", and click "Save".
  7. The system will now download the newer version in a minute! The estimated time is 1 to 3 minutes before an estimated total of 4,811,793 bytes (for version 3.7.0,1) become successfully transferred.
  8. And after that, click "Finish" to close FileZilla client and to start the reinstallation.
  9. Your computer system may now ask you if Do you want to allow the following program (from an unknown publisher) to make changes to this computer? Just press "Yes" to allow it.
  10. The FileZilla Client Setup will automatically uninstall the previous version of your FileZilla, and then after the uninstallation would be completed, it will followed by the installment of the new version.

Thursday, May 23, 2013

9 Steps to Install an FTP Client on Windows

In this tutorial you will see the 9 steps to learn how to install an FTP client (software) on your Personal Computer running Windows. The format of our installation guidelines is minimized in the best way to make the steps straight, for your better reading but it's still understandable and effectively working. These are the 9 steps how to install an FTP client on Windows PC. The FTP client program that we will use as the example of our installation is FileZilla Client:
  • Step 1: The first thing you would need to do is to download the FileZilla Client at this link: FileZilla - Client Download (Internet connection required!)
  • Step 2: Open the downloaded setup (program) which named looks like FileZilla_3.6.0.2_win32-setup (that's the name of FileZilla Client 3.6.0.2 Setup,) and run it.
  • Step 3: If the system ask you like this, “Do you want to allow the following program (from an unknown publisher) to make changes to this computer?” Just allow it by pressing the "Yes" button.
  • Step 4: And accept the terms of agreement of the FileZilla Client program, by just clicking the “I Agree” button.
  • Step 5: Select whether you wish to make the software available to all users but you must have administrator privileges to do this or to just yourself, and click the "Next" button.

Wednesday, May 15, 2013

What's the Best Way to Upload Files to a Server?

There are two common ways to transfer the contents of your website from your computer to the server of your web hosting account, and those common ways are listed below:
  1. To upload files from your computer using the File Manager inside the control panel of your web hosting account. There are many different kinds of file managers. Some hosting account have more than one file manager, yet there's still an account with just one kind of file manager.
  2. To upload contents using any FTP client, such FileZilla or Core FTP for Windows, or Cyberduck for Mac. FTP stands for File Transfer Protocol, and an FTP client is a software application that can connect to your FTP server if you have it, by your authentication and can transfer files.
cPanel Applications for Uploading Files
But there's still other than those ways to upload a file to your web server, like to upload using Web Disk application. Web Disk is an alternative to FTP for transferring files, but it's slightly slower and more complicated to setup. However, it is much more reliable and does not require any additional software (such FTP client,) on most operating systems.

The most known way for uploading files specially for a beginner, is no other than direct uploading via File Manager, in fact it's the first way of uploading that a beginner would be learned in the beginning. The advantages of this transferring way are:
  1. You doesn't need to open another software, like FTP application such FileZilla client.

Monday, April 15, 2013

Configuration for an HTTP Server, Directives

Apache HTTP Server, commonly known as Apache, is the most popular web server software that uses directives for its configuration which can be written into a .htaccess (hypertext access) hidden file, it's hidden for it is started with a "." dot. As directives are used to configure the most popular HTTP server, many other HTTP servers uses the same way to configure their systems too. One of the popular use of an HTTP server is to modifies a web Uniform Resource Locator's appearance which is called “URL Rewriting” and to redirect a web address to another URL, which called “URL Redirecting.” The abbreviation "HTTP" is stands for Hypertext Transfer Protocol. A web server that can modifies URL's appearance is often called as HTTP server instead of web server.
  1. URL Rewriting: Actually, the software that remapping the URL into another URL is called as rewrite engine which is basically runs on a web server. If the URL is rewriting into a different page, even you're viewing the page at that URL, you'll see the other page where it rewriting, even if it exist or not. Here's an example of .htaccess source' directives for configuring the mod_rewrite of Apache HTTP Server to rewrite:
    URL Example:
    1. http://www.example.com/index
    2. http://www.example.com/test
    3. http://www.example.com/anything
    .htaccess Directives' Sample:
    Options +FollowSymlinks
    RewriteEngine on
    RewriteBase /
    
    RewriteCond %{HTTP_HOST} ^(www\.)?example\.com$
    RewriteCond %{REQUEST_FILENAME} !-d
    RewriteCond %{REQUEST_FILENAME} !-f
    RewriteRule ^([a-zA-Z0-9_-]+)/?$ /page.php?file=$1 [NC,QSA]
    Where Example's URLs are Remapping:

Sunday, March 31, 2013

Used for Retrieving Data, Query Languages

A computer language that's often used on Database Management System (DBMS) and by other artificial language for querying a database or information system, is not a programming language but a query language. A query language is important to a server-side programmer, such as PHP(: Hypertext Preprocessor) developers, because it is a way to get the information that intended for a specific user, into a database. There are classifications of query languages like other computer language, and the popular three for the Web, of them are listed below, base on their popularity:

  1. SQL, pronounced not as a word on My Sequel (MySQL) but as just exact as its letter names "S-Q-L", which is short for Structured Query Language and sometimes mistakenly referred as a programming language, instead of a well known class of a database query language for accessing and manipulating relational databases that items are organized in a set of tables, in which item can have relation to another item that's into another table.
    Let Say We've Relational Database Tables:
    - Customers - Orders
    ID Name
    01 Mark
    02 Anthony
    ID No
    01 18495
    02 82796
    Sample of SQL Queries on Database:
    SELECT Customers . Name AS `Customer` , Orders . No AS `Order No.`
    FROM Customers
    INNER JOIN Orders ON Customers . ID = Orders . ID
    ORDER BY Customers . Name
    SQL Queries' Sample Result:
    Customer Order No.
    Anthony 82796
    Mark 18495
    • MySQL is the most used brand of a free Relational Database Management System (RDBMS) which administering by phpMyAdmin a free web database management for RDBMS. A relational database can be called as a server for storing sensitive data items. Most relational databases are administers by database managements.
      • Generally, a relational database is administering by a database management such phpMyAdmin for MySQL, which can perform various tasks like creating, modifying or deleting a database, table, field or a row, browsing, exporting or operating a table, running SQL query or searching data and more!
  2. XPath, the XML Path Language, is a declarative language which is one of the 3 parts of Extensible Stylesheet Language (XSL), used to select nodes from an XML document, and also used by XML Pointer Language (XPointer) to link hyperlinks in XML document to the specific parts of another XML document, and used by XQuery which is built on XPath expressions.

Monday, March 18, 2013

Forms and Meanings, Programming Languages

A web programming language is used for computer programming (often shortened to programming, scripting or coding) that have relation on the World Wide Web. The programming languages have many different types as other artificial languages, and the two types of these that's used for the Web, are listed below:
  1. A scripting is the number one type of programming language that's often used for web development, and this kind of type is divided into two different classes which are nested here:
    1. A client-side scripting, sometimes called as browser-side scripting, is an act to program the web browser of the viewer of a client-side scripted web page or site. In other words, all of client-side scripts are executable on a web browser that supported it.
      • JavaScript is the world's most popular programming language as it's for the websites, servers, PCs, laptops, tablets, smart phones, and more! An external JavaScript file have .js extension. JavaScript is the only client-side scripting language that supported by all major web browsers, unlike VBScript (Visual Basic Scripting Edition) a Microsoft scripting language which only supported by Internet Explorer.
      JavaScript Input's Sample:
      <p id="fnmpl"></p>

      <script>
      setInterval(function() {
          timer()
      }, 1000);

      function timer() {
          var d = new Date();

          var t = d.toLocaleTimeString();

          var weekday = new Array(7);
          weekday[0] = "Sunday";
          weekday[1] = "Monday";
          weekday[2] = "Tuesday";
          weekday[3] = "Wednesday";
          weekday[4] = "Thursday";
          weekday[5] = "Friday";
          weekday[6] = "Saturday";

          var day = weekday[d.getDay()];

          var date = d.getDate();

          var month = new Array();
          month[0] = "January";
          month[1] = "February";
          month[2] = "March";
          month[3] = "April";
          month[4] = "May";
          month[5] = "June";
          month[6] = "July";
          month[7] = "August";
          month[8] = "September";
          month[9] = "October";
          month[10] = "November";
          month[11] = "December";

          var m = month[d.getMonth()];

          var y = d.getFullYear();

          document.getElementById("fnmpl").innerHTML = t + ', ' + day + ', ' + date + ' ' + m + ', ' + y;
      }
      </script>

      Sample's Page Output:

    2. A server-side scripting is an act to program the server of a web document or site, such what content will the web server deliver to a specific user. In other view, a server-side script will first executes on the web server before the server deliver it to a web browser.
      • “PHP: Hypertext Preprocessor” or PHP is the most used server-side scripting language and was designed for web development. One of the reasons why this language was often used by web developers is because almost all web hosting companies and even a free host have supported this computer language.

Thursday, February 28, 2013

Stylistic Rules, Style Sheet Languages

The most used web style sheet is CSS. A web style sheet is a set of styles for designing documents that thereon the Web. An external style sheet is stored in different file of style sheet separated from the documents who links it. Style Sheet Languages (or style languages) expresses the presentation, the looks and formatting of structured documents. There are only two web style sheets in this (2013) generation.
  • CSS, which stands for Cascading Style Sheets, is a style sheet language that can style web pages written in Hyper Text Markup Language or any kind of XML-based language, in other words, an application of Extensible Markup Language. This is the only style language that can be use to style HTML documents. And the most used style sheet language in this time. (2013) The extension of a CSS file is .css which used in external styling, because there are three ways to style the compatible documents for it, the inline style, the internal style sheet and the external style sheet, which are going to explain later.
  • Extensible Stylesheet Language (XSL) was originally developed to be an XML-based style sheet language. It consists of three parts, it is a set of three different computer languages, a style sheet language, query language and markup language:
    1. XSL Transformations (XSLT) is the most important part of XSL. It's a “style sheet language” used to transform XML into another XML document. Normally, XSLT does that by transforming each XML element into an XHTML element. The .xsl extension is for the path name of an XSLT style sheet file, which used to insert into the <xsl:stylesheet> or <xsl:transform> root element.
    2. XPath, also known as XML Path, is a query language used by XSLT (and some other artificial languages) to access or refer to the parts of an XML document. It's a “query language” for addressing parts of an XML, designed to be used by both XSLT for selecting nodes from an XML document, and XPointer (a.k.a. XML Pointer,) to link to the specific parts of an XML document.
    3. XSL Formatting Objects, also known as XSL-FO, was now formally named as Extensible Stylesheet Language (XSL) as its generalized style sheet language under it. XSL(-FO) is a “markup language” for specifying formatting semantics which is often used to generate Portable Document Format (PDF) files. An XSL-formatted file can be with .xml extension but the specific extension which was exist to used on their files is an .fo or an .fob file extension.

Web developers knew that the HTML is the most used web development language, and because Cascading Style Sheets is the only style sheet that can design HTML documents, it became the most used web style sheet. A little stylistic HTML script example below that styles with internal style sheet, to know how Cascading Style Sheets works:

HTML Source:

<style type="text/css">
#srssl-sample {
width: 230px;
margin: 0 auto;
background: #808080;
padding: 4px 0;
}

#srssl-header {
background: #FFFF00;
width: 222px;
margin: 0 auto;
text-align: center;
font-size: large;
font-weight: bold;
}

#srssl-container {
width: 222px;
margin: 4px auto;
background: #FFFFFF;
padding: 2px;
}

#srssl-sidebar {
float: left;
width: 64px;
background: #FFC0CB;
font-size: small;
margin-bottom: 20px;
}

#srssl-content {
float: left;
width: 152px;
background: #87CEEB;
margin-bottom: 20px;
padding: 0 3px;
}

.srssl-clear {
clear: left;
background: #FF0000;
height: 3px;
}

#srssl-footer {
width: 218px;
background: blue;
margin: 0 auto;
font-size: small;
color: white;
font-style: italic;
text-align: right;
padding: 0 2px;
}
</style>

<div id="srssl-sample">
<div id="srssl-header">This is a Header</div>
<div id="srssl-container">
<div id="srssl-sidebar">This left column is a sidebar.</div>
<div id="srssl-content">This main column is for the contents.</div>
<div class="srssl-clear"></div>
</div>
<div id="srssl-footer">This is a Footer</div>
</div>

Monday, February 11, 2013

Tags' Symbols and Rules, Markup Languages

Do you know that the first computer language for developing websites that a web developer should learn is a markup language? It is used to markup a document, have symbols and rules for doing elements and attributes of a document, and that's why it is the most used type of computer language on the World Wide Web (simply as WWW or W3,) because without this, you can't markup correctly, such as no link, no table, no title, no description, and no keyword, just a graphical text.

A markup language that have an application, can be called as a "generalized markup". The most used generalized markup in this time is listed below:
  • A Standard Generalized Markup Language (SGML for short,) is developed and standardized by the International Organization for Standardization (or ISO) in 1986. Most tags of a SGML does have a start tag and end tag, same to the tags of the SGML standard and SGML-based languages' HTML and XML standard. SGML was extended from Generalized Markup Language (GML). SGML and GML are both systems for organizing and tagging elements, but SGML wasn't based on GML, they are completely different! Because GML has different symbols such ordered list's start :ol tag and end :eol. tag, and most of GML tags doesn't have an end tag such :li. for defining list item, :h1. to define heading 1 and :p. to define a paragraph.
There are many SGML-based languages or applications of a Standard Generalized Markup Language exist now and the most used of those languages are listed below:
  1. Hyper Text Markup Language (also known as HTML,) is have their own set of predefined tags for doing elements and attributes of a document. .html and .htm are the file name extensions for HTML files. The HTML tags that has no end tags can written as just their start tag such <br> without closing it and can be closed as <br/>, all HTML tags are case-insensitive and even the format that you've been made wasn't right, most web browsers will display it correctly. And because of these, HTML doesn't have application.
  2. XML means Extensible Markup Language, originally designed to carry data and have an .xml filename extension. In XML, all elements must properly closed and the tags' capitalization are case-sensitive. The XML standard tags are not predefined as HTML, so you could invent your own tag such start <invented> tag and end </invented> tag, this tag was just invented. There are now many XML-based languages exist because of its proper and well-organized syntax, including the popular XHTML.
    The often used families of markup languages of Extensible Markup Language, also known as XML-based languages or applications, are listed below:
    1. XHTML means Extensible Hyper Text Markup Language, it has the same set of functions and tags as HTML, but with syntax as strict and clean as XML, such a tag that has no end tag in HTML such <br> or <br/> must be properly closed as <br /> and tags' capitalization are case-sensitive like XML, and that's why it's in the family of XML instead of HTML. The filename extensions that build for XHTML files are .xhtml and .xht but XHTML can also use the XML standard and HTML's filename extensions. Yet, the .html filename extension is still the most used.
    2. A computer language, Atom (standard) is used for developing web feeds. Atom documents has a filename extension of .atom, or .xml as it is an aplication of Extensible Markup Language. An HTML document can be linked to an ATOM feed using <link> tag. Atom is more advanced syndication format than RSS.
    3. Rich Site Summary also known as Really Simple Syndication (abbreviated as RSS,) is a family of news feed formats and their documents have .rss or .xml filename extension. The first version of RSS was released in March 1999, it is older than Atom standard which was first published in December 2005, and a former primary method of web content syndication before Atom.

Thursday, January 31, 2013

Welcome to Web Development Technologies

Developing "Web" Sites is a weblog of a web developer, with tutorials, sources, examples, guides, tips, suggestions or corrections, references, and other information relating to web development technologies, including HTML and CSS of the web, browser-side or client-side scripting JavaScript, server-side scripting PHP and SQL for databases, with security guides and more, for you (our readers) to learn how to build and develop different types of a real and secure, free or even a paid, personal or commercial website.

Our tutorials are with a view of HTML source to see clearly the codes that you're looking for, and with an example to know the effect or the difference of the instruction to others. And if there's a vulnerability from hacking attacks, like a cross site scripting, SQL injection, and local or remote file inclusion, we do include a security guide on the tutorial for securing your website from vulnerability. We have tips for building your site, like what domain name registrar and web hosting service are the best and good to use, and what is a big waste of time to use such scam products. We will also have suggestions or corrections on improving some web development portals from their mistakes, because there are some web developer's portals with a tutorial which was vulnerable from attacks. All of the corrections in this weblog are true and not build for black propaganda.

Sunday, January 27, 2013

The Path's Dirname, Basename and Extension

One of the important thing to know if you are a web developer is the information of a path of a file. If you're in studying of server-side programming language, such as PHP: Hypertext Preprocessor, also simplified as just PHP, you may saw some filesystem functions like dirname() function which is used to returns the directory name, and basename() function used to returns the file name, from a path. And frequently seen suffixes of web addresses or URLs of static websites such .html and .php are called as an extension.

http://developingsites.blogspot.com/2013/01/the-paths-dirname-basename-and-extension.html
For example, we have a Uniform Resource Locator (also known as simply as URL,) of this blog post as I mentioned above and its details are listed below:
  1. First of all, the first thing you should know is the path name on the web address of this web page. A path is the general form of the name combining a file and directory, and it's simply as all the text in bold on the URL that I've written above, as /2013/01/the-paths-dirname-basename-and-extension.html and remember that all of the names after the name of a domain name such http://developingsites.blogspot.com before another slash [/] is a path name.
  2. The dirname is highlighted with the color orange, /2013/01 but remember if the sub directory "/01" did not exist, the directory will just become /2013 and if the home page of a web site doesn't have a path but just a slash, [/] such as http://developingsites.blogspot.com/ or just a file name such as http://developingsites.blogspot.com/index.html these URLs doesn't have a dirname but just a directory of a slash as exact as / (forward slash).

Tuesday, January 22, 2013

Most Used Webmasters' Computer Languages

If you want to be a good web developer, of course you need to learn a computer language for developing websites, which is sometimes (unofficially) called as simply as a web language. The often used web languages are also the popular web languages. And there are many types of computer languages for web development. Such as a markup language which is used to write a document. A style sheet language, used for markup language's files, for styling a document. Programming languages which have two kinds of scripting, the client-side scripting (also called as browser-side scripting,) used for programming a web browser, and the server-side scripting language was used for programming a server. And one of the types of web languages, a query language which is act and can be called as a database managing language, specially use with programming language.
  • Hyper-Text Markup Language (officially abbreviated as HTML,) is a markup language as you see on the last two words of its title. It is the most used language for building websites because it's for marking up what's the head, body, title, table and the other parts of a web page.
  • Cascading Style Sheets (CSS) is a style sheet language used to setting up the style and layout of a document written in a markup language that compatible for it. It's totally used for styling by linking many pages unto CSS file to allow it to manage all their styles.
  • JavaScript (sometimes abbreviated as JS,) is often used for client-side scripting, to program the web browser to enhanced user interfaces and dynamic websites. It can be inserted or attached into HTML pages, and (simply,) it's often use to make a website looks alive.

Types of Webmasters' Computer Languages

Not because there's a computer language which artificially created by a human, means that it's without any classification. A computer language without classification, is cannot be! Because every different type of it has a different usage, such as for documenting, styling and programming. These are the types of computer languages for developing websites which often used by web developers, ordered by their popularity.
  1. A markup language is the most used type of computer language for developing websites because it's a modern system for coding a document while reading the text therein this kind of artificial language. All the web pages that you can view using web browser has a markup language.
  2. A style sheet language also simplify as style language, is used for styling a document written in the markup language that compatible for it. A single style sheet can manage all the styles on many compatible documents that linked thru it. The information about the design of a document is often in a style sheet file which is separated from markup files.
  3. A programming language is used to program the system of a website, such as a dynamic site that does changing content depends on the act of user and the parameter that given by the server. There are two classes of programming languages, the client-side scripting for programming the web browser of a viewer, and the server-side scripting and this is for programming the server.