Sunday, July 21, 2013

How to Install and to Update an IDE for Web?

Why should a web developer write code using an integrated development environment (IDE) for web development? Simply because of its tools and features such as intelli-sense, short for “intelligent sense”, which attempts to speed up the process of coding web applications by reduction in misunderstandings, typos and other mistakes that programmers commonly make.

Installing an IDE

Here, you will see the instructions for installing an integrated development environment, and the specific IDE that we'll going to install as our example is a freeware, Microsoft Visual Studio Express 2012 for Web. You can install “Visual Studio Express 2012 for Web - English” at Windows Web App Gallery - Install an App.

Web Platform Installer 4.5 Fail to Install Visual Studio Express 2012 for Web - English

Keep note, some people are reporting that the Microsoft Web Platform Installer (WPI) is broken. Mostly if you'll going to install Visual Studio Express 2012 for Web on the computer which was allowed its other user to log in automatically after starting it without entering user name and password, because installing this VS Express will require to reboot your computer, therefore, after restarting, you'll be logged with a different user. Or if you didn't leave the “Windows Web App Gallery - Install an App” page open until the WPI starts. Now, if it fail with such details that's shown on the image above, please follow these steps:

  1. Internet connection required! Download “Microsoft Visual Studio Express 2012 for Web” from Download Microsoft Visual Studio Express 2012 for Web from Official Microsoft Download Center.

Friday, July 19, 2013

Types of Web Development Applications

There are types of software applications for web development that's used by web developers or even web designers for developing or designing websites. Many of those types with their so-called classes, are listed below.

Text Editors:

Some text editors are simple, while others offer broad and complex functions that's used for writing source code and programming.

  • A text editor is a type of program used for editing text files. Some regular text editors such as Windows Notepad (software) can save as HTML and Cascading Style Sheet (CSS) documents simply by using file extensions such as ".html", ".htm" and ".css". There are also text editors designed for use from a command line interface (CLI) and in a graphical user interface (GUI) such as Vim.
  • A source code editor such as Sublime Text, is a text editor program designed specifically for editing source code of computer programs by programmers, and can able to edit any code, whether it's CSS document or PHP file unlike some HTML editors. There are programmers that likes to use this kind of text editor and not to use an integrated development environment for a reason.

HTML Editors:

There are various forms of HTML editors such as text, object and WYSIWYG editors. For more information about HTML editors, please visit The “Text, Object and WYSIWYG” HTML Editors.

  • Text editor is one of the types of HTML editors as it can act like a basic HTML editor that can able to edit HTML documents, mostly if it can save files with file extensions such as ".html" and ".htm".
  • An HTML (hyper-text markup language) editor is a web design program for creating web pages. Some HTML editors couldn't edit the file other than HTML document that end in ".htm" or ".html" and designed not for program's source code but for writing HTML code.
  • Object editors are web page-creation tools that functions like Blogger Layout object editor. You couldn't see on the interface what you get but you'll see the objects of your website, that can be drag and drop in order to rearrange their positions or orders.
  • WYSIWYG (what you see is what you get) HTML editors provides an editing interface which resembles how the web page will be displayed in a web browser. Despite of their nice interface, they could only build static websites, in contrast to dynamic sites.

Tuesday, July 16, 2013

How to Install a Software on Your Website?

There are ways for installing a software such Content Management System (CMS), on the server of your web hosting account. If you have no idea what a software is, please take a look at the Types of Web Hosts and Website Software.

Manual Installation:

The list below will give you an understanding how to manually install a software, considering that the software that we'll trying to install is an open source CMS called Pligg (specifically Version 1.2.2), which replicates some of Digg's features and back-end:
  • Your domain name on a Domain Name Registrar or Registration Service must be prepared.
  • Check the required web hosting features of the software that you'll going to use. Most requirements are written on the software's official site. In fact, the Requirements to Run Pligg are written at Download Pligg Content Management System _ Pligg CMS. And follow the right one among these following actions depend on your situation what you have done first:
    Find a web hosting service that's fully supports the requirements, and point your domain name to the DNS your of web host. If you already have a web host, your account must supports the requirements. Or upgrade your plan or find another web host if it's not supported.
  • Download the latest version of the software that you've wanted. For example, the latest Pligg from Download Pligg Content Management System _ Pligg CMS. The estimated time of downloading it is just 1 minute. Some site required you to register an account first before they allow you to download their product.
  • Unzip the downloaded package if it's zipped by following the guide How to Extract a .ZIP file. Some online installing instructions have a step to unzip their package.
  • And read the ReadMe document which is often named as readme.html on the down one folder of the extracted folder, where the software components such index.php is located. Other software package have a top text document such “Pligg README.txt” for Pligg, on the folder of the extracted package, that will tell you where to find the ReadMe document.
  • In the Installation section of “Pligg CMS 1.2.2/pligg/readme.html”, you will be instructed to do such kind of things:
    1. Create a MySQL database. If you are unfamiliar with how to create a MySQL database, please... (visit Creating and Managing a Relational Database on Web Hosting Control Panel.)
    2. Rename the /languages/lang_english.conf.default file to "lang_english.conf". Same instructions apply to any other lang_LANGUAGE.conf.default file that you might use that are located in the /languages directory. (The software components in “\Pligg CMS 1.2.2” are located at \pligg directory. If renaming an extension warns you by your system with a new window Rename, If you change a file name extension, the file might become unusable. Are you sure you want to change it? Just allow it every time it appear by pressing "Yes".)
    3. Rename the file approvedips.txt.default to "approvedips.txt".
    4. Rename the file bannedips.txt.default to "bannedips.txt".
    5. Rename the file settings.php.default to "settings.php".
    6. Rename the file local-antispam.txt.default to "local-antispam.txt".
    7. Rename the /libs/dbconnect.php.default file to "dbconnect.php".
    8. Now upload the component files of the software to your web hosting server. (The best way to upload a huge amount of files is through an FTP client. Please visit Uploading Files with an FTP Client.)

Sunday, July 14, 2013

How to Change File Permissions or CHMOD?

CHMOD and Change File Permissions are used to change the access of a file to file system objects including files and directories. The name CHMOD stands for or is an abbreviation of change mode. Here is a great video for learning how to change file permissions or to CHMOD a file:

Uploading Files to a Server via an FTP Client

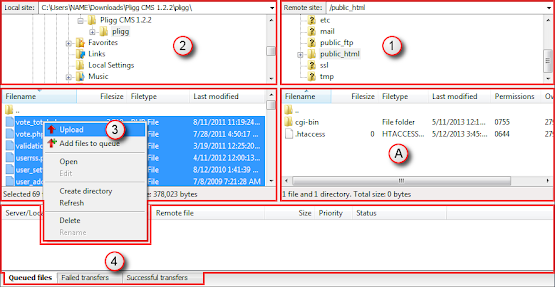
This is the guideline to upload contents from your computer to the server of your web hosting account with an FTP client. The specific FTP client that I'll going to use is FileZilla Client (3.7.1), and the specific files that I'm going to transfer are all the files in the "pligg" folder of the unzipped package of Pligg CMS 1.2.2 as our example:
Step and option elements of FileZilla's window layout for uploading
  • First, you need to connect your FTP client to the FTP server of your web hosting account by these instructions.
  • And do the specific action below depend on the connection option that you've been chosen, when Status: Directory listing successful be shown on the message log, mostly in FileZilla Client:
    When the Manual Settings or the details of your FTP user that you've been chosen have the exact path of the Document Root of your domain, just make sure the “Remote site:” (1) of the remote pane (1 & A) is just as single "/" slash. But when the Manual Settings or the FTP details have the Path of the parent folder of your domain's document root, you need to browse and set the current address of the “Remote site:” (1) which is "/" in default, to the folder of your domain, for example as "/example.com".
    Just be patient and wait the FTP client (software) while it's directory listing every time you select a new different “Remote site:” (1).
  • And browse the Local site: (2) of the local pane (2 to 3) and set it to the address of the folder containing all the files that you're going to upload, which in this case on my computer is: C:\Users\NAME\Downloads\Pligg CMS 1.2.2\pligg
    (Note: You can do this step first before connecting to a server for avoiding Error: Connection closed by server.)

Connecting to an FTP Server with an FTP Client

The first thing to do if you want to use an FTP client (software) is to connect it to the FTP server of your web hosting account. If you don't know what an FTP client is, please visit What's the Best Way to Upload Files to a Server. Here are the instructions how to connect to an FTP server and the FTP client that I'm using is FileZilla Client:
  • Make sure you have an Internet and run a web browser to check the Manual Settings or the details of your FTP account. For cPanel user, follow these instructions to find the Manual Settings. But even a different web hosting control panel that's quite similar to cPanel can follow this but maybe with a different action as just example:
    1. Go to and login to your cPanel.
    2. Click on “FTP Accounts” which is located in the Files (heading) section.
    3. There may configurations that you can use for your FTP client and these are the better two:
      In the FTP Accounts section, look for the row with the exact PATH of the Document Root of your Addon Domain or Subdomain and click the “Configure FTP Client” action on that row. And if there's no exact FTP Path, you can just Add FTP Account with the Directory of your domain's root and “Configure...” that new FTP account. Or in the Special FTP Accounts section, you can seek the row with the PATH of the parent directory of the Document Root of your domain. For example if your domain's root is "/home/USER/public_html", the parent of that root is "/home/USER". And after that, click the “Configure FTP Client” action on that row.
    4. These are the two specific results for those 2 specific actions on the previous step:
      And now, you will see the Manual Settings with the path of your domain or subdomain name for your FTP client. The Manual Settings that you'll see in the second configuration have a PATH of the parent folder of your domain's document root.
    Here is another way to find the details of your FTP user for other kind of control panel, or if this isn't the exact way to find those details in your c-panel, just use a logic, at least to get some tips:
    1. Go to and login to your web hosting control panel.
    2. If you didn't redirect to the Home of your control panel but to the other page such Special Offers after logging in your web hosting account, just find a way to the control panel's home, you can try to click on "Home".
    3. In the Website Manager (heading) section of the Home of your c-panel, click on “FTP Manager”.
    4. Then find a compatible user on the FTP users in your account for your domain or subdomain:

Tuesday, July 9, 2013

Creating a Relational Database on C-Panel

There are many kinds of relational databases, such a MySQL database of MySQL a relational database management system (RDBMS) and a PostgreSQL database of PostgreSQL an object-relational database (ORD).

Creating a MySQL Database

Some web hosting control panels have a MySQL Database Wizard application that will guide you step by step on the creation of a MySQL database. Here are the steps to create and manage a MySQL database through this wizard app. for cPanel user. In the Home of your control panel:

This is a guide to creating and modifying MySQL database(s) in cPanel, through the “MySQL® Databases” application:

Monday, July 1, 2013

What is a .ZIP file and How to Extract It?

A .ZIP file is an archive file containing one or more files or folders that have been compressed. The file size of compressed file is much lower than the size when it's not yet compress. .ZIP files generally use the file extensions ".zip" or ".ZIP" and can be decompress or unzip by a specific file archiver. Almost all software packages that can be download on the Internet are compressed, mostly in zip (file format). There are ways to compress zip file, and the standard way to do it is by using a file archiver.

Now we will use a file archiver to unzip a zip file. My recommended file archiver to extract a zip file is no other than an open source, 7-Zip. And here is the 7 steps to do it using 7-Zip:
  1. The first thing you need to know is your computer must have file archiver program installed on it. For example a file archiver at this time is 7-Zip, and the guidelines of this program's installation is written in What is and How to Install a File Archiver?
  2. When the file archiver installed on your computer, just right click on the zip file that you wish to be extracted or in other term, to unzip.
  3. Click or just point your mouse cursor to the "7-Zip" option on the options that would appeared after doing the previous step.
  4. Then now click "Extract file..." on the bar at the side of the "7-Zip" option that will appear after the previous step.
  5. Now you will see a new window titled Extract. There you will see the “Extract to:” text field filled with the path name of a folder where the extracted files of the zip file will be placed later. You can even browse that field and change the pathname to a different folder if you want. Yet, you can also configure the “Path mode”, “Overwrite mode” and fill the “Password” field if you wish. There is a "Help" button if you didn't knew those options. And click "OK".
  6. In this time the zip file is now Extracting... or unzipping, in just a second!