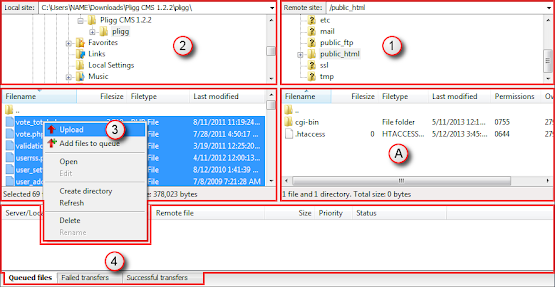
This is the guideline to upload contents from your computer to the server of your web hosting account with an FTP client. The specific FTP client that I'll going to use is FileZilla Client (3.7.1), and the specific files that I'm going to transfer are all the files in the "pligg" folder of the unzipped package of Pligg CMS 1.2.2 as our example:
- First, you need to connect your FTP client to the FTP server of your web hosting account by these instructions.
- And do the specific action below depend on the connection option that you've been chosen, when
Status: Directory listing successful
be shown on the message log, mostly in FileZilla Client:
Just be patient and wait the FTP client (software) while it's directory listing every time you select a new different “Remote site:” (1).When the Manual Settings or the details of your FTP user that you've been chosen have the exact path of the Document Root of your domain, just make sure the “Remote site:” (1) of the remote pane (1 & A) is just as single "/" slash. But when the Manual Settings or the FTP details have the Path of the parent folder of your domain's document root, you need to browse and set the current address of the “Remote site:” (1) which is "/" in default, to the folder of your domain, for example as "/example.com". - And browse the Local site: (2) of the local pane (2 to 3) and set it to the address of the folder containing all the files that you're going to upload, which in this case on my computer is: C:\Users\NAME\Downloads\Pligg CMS 1.2.2\pligg
(Note: You can do this step first before connecting to a server for avoidingError: Connection closed by server
.) - Now select all the contents that you're going to transfer, in the local folder's files (3) of the local pane (2 to 3) below the “Local site:” section (2), by left clicking on any file followed by “Ctrl + A” to select them all (if you'll upload all the contents therein), and right click on any selected content and choose "Upload" (3).
- If
Error: Connection closed by server
, your FTP client will attempt to establish a new connection. The estimated time of uploading 69 files and 12 directories in the total size of 4,680,668 bytes, is between 21 to 27 minutes. Just wait until all the queued files successfully transferred.- If the “Target file already exists”, you can choose the
Overwrite if different size or source newer
radio button. You can also check for theAlways use this action
box and its child boxes if you want, and then click "OK". - You can also pause the transferring by unchecking the “Process queue” item a.k.a.
Toggles processing of the transfer queue
, canceling the current operation by pressing the "Cancel" (current operation) item and more actions on the toolbar at the top of the layout.
- If the “Target file already exists”, you can choose the
- When there's no failed transfer nor queued file on the transfer queue (4), you have successfully transferred all the stuffs that you have been queued to upload.
- If there's a failed transfers on the transfer queue (4), left click on the “Failed transfers” and right click on any failed transfer and “Reset and requeue...” all the failed transfers for your server. And then right click to any queued file and click “Process Queue”.
- But if the message log displays such
Response: 550 spellChecker.js.gz: Forbidden filename
, your web hosting account didn't allow to upload such kind of filename with that file extension. If the file that you couldn't upload is not used by the system of a specific software in default though, then you shouldn't have a problem using that software without this file. But I would recommend to find a web host or make your hosting account allowed you to upload such kind of file for avoiding some bug in the future. - If you're willing to delete the files that you've already transferred, just select those files on the remote folder's files (A) of the remote pane (1 & A) and right click on any selected file, then choose "Delete". And wait until they're all deleted.
And that's it! Now you know how to upload contents from your PC to the FTP server of your web hosting account using an FTP client.


No comments:
Post a Comment
You can use some HTML tags, such as <b>, <i> and <a> tags, but please do not spam.