
The manual installation of WordPress (Software) that's instructed in this documentation is divided into five parts. But of course, you need to get a domain name and find a suitable web host that meets the system requirements first before proceeding to the installation. You can follow these guidelines to install WordPress to your website.
Download and Extract the Software Package
- Go to WordPress › Download WordPress.
- And click on such as the “Download WordPress 3.6.1” button for version 3.6.1, to download the software package.
- Wait a minute while your computer is downloading such as the "wordpress-3.6.1.zip" file for the version 3.6.1. It may take 1 to 2 minutes, depends on the speed of your connection and if the server isn't busy.
- Now “Show in folder” the newly downloaded ZIP file.
- And ‘Extract to "wordpress-3.6.1\"’ (or to what version your WordPress is,) that ZIP archive.
Now you have the real contents of WordPress software if you've followed the instructions above.
Create a Database and Its User
- Log in to your control panel.
- Note that you need to remember the values of the database name, username and the password you chose and the value of your database hostname if any which is usually be "localhost" in default.
- And create a MySQL database and its user, and select all the privillages for this user to complete the task.
Set Up "wp-config.php" File
You can either rename and edit the "wp-config-sample.php" file yourself, or you can skip this section and let WordPress try to do this itself when you run the installation script. You just need to tell WordPress your database details later while Running the Script if you've skipped.
- On your computer, find the extracted file folder such as "wordpress-3.6.1" in my case, which is often in the Downloads folder of the user's home directory.
- Open that folder, and under it, there you will see another folder named "wordpress".
- And open that folder named "wordpress".
- Now, you will see the "wp-config-sample.php" file.
- Right click on this PHP file to "Rename" it.
- And change the name of the "wp-config-sample.php" file to "wp-config.php".
- Now, edit the renamed file "wp-config.php" with a text editor. And enter your database details under the section labeled:
// ** MySQL settings - You can get this info from your web host ** //- Change the value "database_name_here" to the database name you created for WordPress.
- Change the value "username_here" to the username of your database user you created.
- Change the "password_here" to the password of your DB user that you chose.
- Change the value "localhost" if only your MySQL hostname is different from that value.
- The database character set therein the file is "utf8" and normally should not be changed!
- The database collation with the attribute of
DB_COLLATEshould normally be left blank!
* Authentication Unique Keys and Salts.- And run a web browser (but don't close the text editor) and go to: https://api.wordpress.org/secret-key/1.1/salt/
- And copy all the code text therein the web page. It contains automated random secret key values.
- And go back to your "wp-config.php" file-editing text editor.
- And select from the beginning of the line with the code
define('AUTH_KEY',to the end of the line started with the codedefine('NONCE_SALT', - And paste your copied text into the selected part.
You are now have your own "wp-config.php" file which is specify for your WordPress software.
Upload the Files
Now we will start uploading the software package with our "wp-config.php" file. And remember, the location of the document directory for your website in the filesystem on your web server will vary across hosting providers and operating systems. So, it's better to find the location of your root web directory first, to make it sure.
-
- If you want to install the software in the root directory of your website. (E.g. example.com)
- You should upload all the contents of the "wordpress" folder under the folder such as "wordpress-3.6.1" but not the folder itself!
- If you want to install in a subdirectory of your website. (E.g. example.com/blog/)
- Rename the "wordpress" folder under the folder such as "wordpress-3.6.1", to your desired name for an unexisting subdirectory of your website!
- And you should upload the renamed folder and not the contents therein.
- If you want to install the software in the root directory of your website. (E.g. example.com)
- And the “Remote site:” where you should upload the software files or the software folder, would be the location of the document root for your website, for your hosted domain or subdomain, whatever you want.
- And now start uploading files/folder to your web server through an FTP client such as FileZilla Client.
Transferring WordPress software through FTP client may take 11 to 15 minutes before all the contents transferred successfully.
Running the Script
And if all the software contents has been transferred successfully, now it's time to run the script.
-
- If you placed the WordPress files in your root web directory, you should visit such as: example.com/wp-admin/install.php
- If you placed the WordPress files in a subdirectory called "/blog", you should visit such as: example.com/blog/wp-admin/install.php
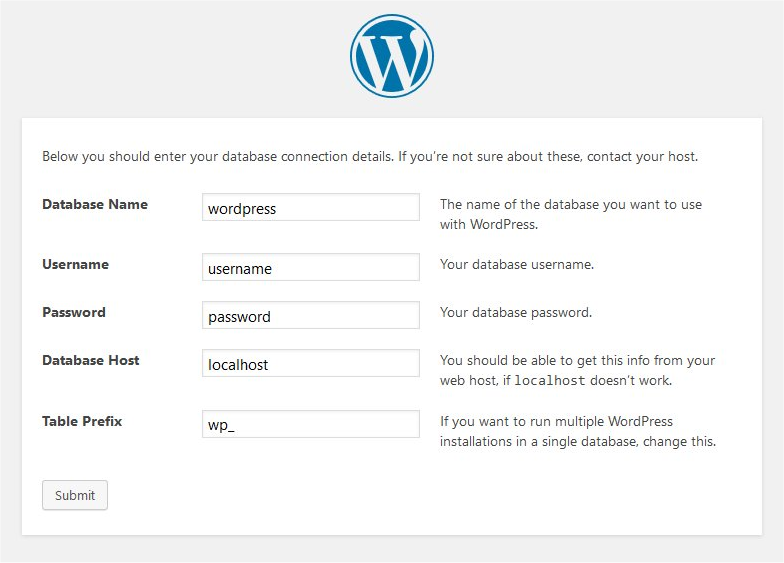
- If you skip to Set Up "wp-config.php" File, WordPress will tell you and offer to try to create and edit the file itself. It will ask you the following database details for your site and write them to a new "wp-config.php" file:
- If you already have "wp-config.php" file, provide the following details on the Information needed section. You can always change the settings that you'll going to chose later.
- Fill the title of your website in the “Site Title” row.
- Fill the administrative username in the "Username" row.
- Next is to input your secret “Password, twice”.
- And the email of the administrator in “Your E-mail”.
- Uncheck the "Privacy" only if you don't want to allow search engines to index your site!
- The next step 2 on the installation script is headed by the word Success!, which will list the Username you chose, the unseen Password and no other else.
- There's also a “Log In” button therein this step.
And if you see the last step that's headed by the word Success!, the WordPress software is now successfully installed to your website.
YY6M2FANFH9Z
This comment has been removed by the author.
ReplyDelete